Java Facade Integration
This guide explains how to integrate the TPSDK facade into an Android Studio project.
These steps are intended as a reference—there are often multiple ways to achieve the same result.
Create a New Project
Create a new project in Android Studio.
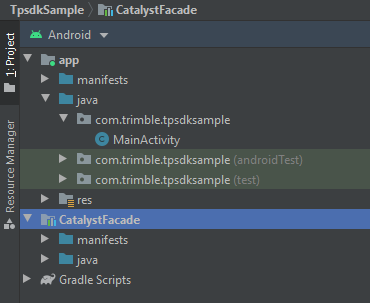
Once your project is set up, go to File > New > Import Module.
In the file chooser, navigate to the CatalystFacade folder from the Java sample included in the SDK zip file.
Import the CatalystFacade module so it becomes part of your project.
Copy Libraries and Native Files
TPSDK uses different technologies to provide outputs for Java and C#.
A core part of this stack is native libraries, which must be copied manually.
There are several ways to import native files in Android Studio.
The current sample uses the following structure. With this layout, Android Studio will pick up the native files automatically and you do not need an extra sourceSets override:
.
├── CatalystFacade/
│   ├── build.gradle
│   └── src/main/
│       ├── AndroidManifest.xml
│       └── java/
├── YourApp/
│   ├── build.gradle
│   └── src/main/
│       ├── AndroidManifest.xml
│       ├── java/
│       ├── jniLibs/        // ABI-specific .so files
│       └── res/
└── SSI/
    └── libs/               // AAR dependencies referenced by Gradle
- Copy all ABI-specific
.sofiles intosrc/main/jniLibsof your app module. - Copy the required
.aarfiles intoSSI/libs.
The facade itself loads a substantial set of native libraries at startup, including the datum transformation components and GNSS driver layers, so the .so files must match the AAR package set you ship.
Adjust Gradle Files
At this point, a simple Make Project command will fail because the facade is not yet referenced by your app.
The checked-in sample uses a library module for the facade and references the Trimble AARs from ../SSI/libs.
For the facade module itself, the sample build.gradle looks like this:
apply plugin: 'com.android.library'

android {
    compileSdkVersion 36

    defaultConfig {
        minSdkVersion 21
        targetSdkVersion 36
    }

    compileOptions {
        sourceCompatibility = JavaVersion.VERSION_17
        targetCompatibility = JavaVersion.VERSION_17
    }
}

dependencies {
    compileOnly fileTree(dir: '../SSI/libs', include: ['*.aar'], exclude: [])
}
Then update the build.gradle file of your main module to reference both the facade module and the Trimble AARs:
dependencies {
    implementation fileTree(dir: '../SSI/libs', include: ['*.aar'], exclude: [])
    implementation project(path: ':CatalystFacade')
}
The sample application currently targets:
compileSdkVersion 36targetSdkVersion 36minSdkVersion 21JavaVersion.VERSION_17
If you keep the default Android layout and place native libraries under src/main/jniLibs, you do not need to add a custom JNI source directory block.
Finally, run a Gradle sync and then Make Project to complete the integration.
Your project should now build without errors.
Manifest Requirements
The sample app requires more than just location permission. At minimum, review the following manifest items in your application:
<queries>
    <package android:name="com.trimble.bluebottle" />
    <package android:name="com.trimble.trimblemobilemanager" />
    <package android:name="com.trimble.empower.em100msp" />
    <package android:name="com.trimble.empower.em120msp" />
</queries>

<uses-permission android:name="android.permission.INTERNET" />
<uses-permission android:name="android.permission.ACCESS_FINE_LOCATION" />
<uses-permission android:name="android.permission.ACCESS_COARSE_LOCATION" />
<uses-permission android:name="android.permission.ACCESS_NETWORK_STATE" />
<uses-permission android:name="android.permission.READ_PHONE_STATE" />
<uses-permission android:name="android.permission.BLUETOOTH" />
<uses-permission android:name="android.permission.BLUETOOTH_ADMIN" />
<uses-permission android:name="android.permission.BLUETOOTH_SCAN" />
<uses-permission android:name="android.permission.BLUETOOTH_CONNECT" />
<uses-permission android:name="com.trimble.empower.permission.ACCESS_MODULE_MANAGER" />
<uses-permission android:name="com.trimble.empower.permission.CLAIM_MODULE" />
If you support pre-Android 12 devices, also review whether your app still needs WRITE_EXTERNAL_STORAGE in your own project setup.
The sample also requests the relevant runtime permissions before initializing the main UI.
Using the Facade
You can initialize the facade with code like:
CatalystFacade facade = new CatalystFacade(myAppGUID, this);
The constructor shown above is correct, but it is only the first step. In the sample, the application flow is:
- Create the facade with your application GUID and application context.
- Load a subscription.
- Initialize the required driver.
For example:
CatalystFacade facade = new CatalystFacade(myAppGUID, getApplicationContext());

ReturnCode subscriptionResult = facade.loadSubscription();
if (subscriptionResult.getCode() == DriverReturnCode.Success) {
    ReturnCode driverResult = facade.initDriver(DriverType.Catalyst);
}
If your workflow uses Trimble Mobile Manager, use loadSubscriptionFromTrimbleMobileManager(...) instead of loadSubscription().
where myAppGUID is the application identifier provided by Trimble.
Note:
The sample application performs subscription loading before driver initialization, and it also requests runtime permissions before enabling the UI. Your app should follow the same overall sequence.